
Setting Up Daycare Online Registration
Watch the Video | More help articles about Daycare
How to setup online daycare registration
If you wanted to setup daycare for online registration that can be done by the following process. You will first want to start by going into your Admin module and clicking on the Setup tab. You will want to select Online Registration from the first sub menu that appears down below. Immediately below that sub menu, another sub menu should show and from that menu you will want to select Daycare.

Daycare registration page
This will bring you to your daycare registration page where you can create available drop off times, set a closed schedule, and also set when you want registration to close. To create a Daycare opening you will want to look for the section titled Availability Settings. Inside this section you will want to put a check next to any day of the week you would like to be open. Immediately next to those days is the area to set your hours for each day that you want to allow clients to use the daycare service.
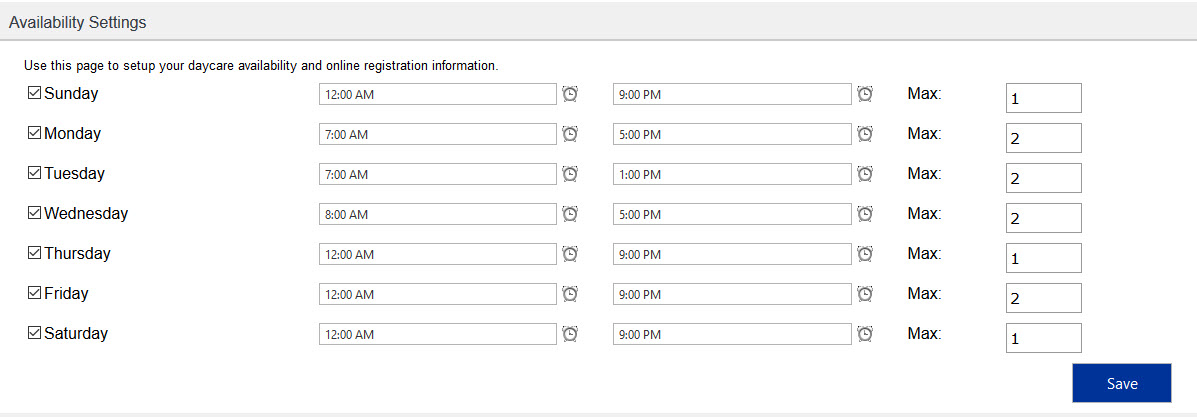
Once you are finished setting your days and times you will want to click Save to save your changes.
General Settings
If you wanted to only allow your clients to book a short time in advance, or if you wanted to close your sign up option a few days before the daycare started that can be done from inside the Other Settings section. Inside this section you will have three options. The first is Days before to close. This option is what you will adjust if you want to close your daycare registration X amount of days early. For example if you had a daycare opening on Tuesday and if you set that Days before to close to 1. That would mean Sunday would be the latest that clients could sign up for Tuesday’s opening. On Monday the opening would grey out as if it was closed.
![]()
The next option in this section is Weeks ahead to allow. This option will determine how far in advance your clients can make appointments. For example if you set Weeks ahead to allow to 4, this would mean that your clients can view your openings 4 weeks in advance.
![]()
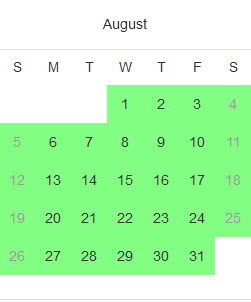
The next option in this section is Available date color. This option will determine what highlighting color will be used for the available dates in your daycare section on the client registration portal. Here is an example of what your clients could see based off the color you choose:

Public Registration Tab Text: allows you to specify a different name to use for 'Daycare' tab in the Client Registration Portal. NOTE: the system will still show 'Daycare' internally in the Admin portion of the program.
There are also checkboxes found inside of the General Settings section as well. The checkboxes are as follows:
- Enable wait list sign-up - Checking this checkbox would turn on the ability for clients to sign-up for a wait list. If the particular date they attempted to sign-up for was full, then they would be asked if they want to sign-up for the wait list. If this checkbox was not checked, then clients would be unable to sign-up for that date because it is full.
- Allow clients to enter comments during registration - Checking this checkbox would allow clients to enter in comments during the registration process. If a client had submitted a comment, it would appear as a note next to that daycare registration.
- Add clients as 'pending' when scheduling daycare internally - Checking this checkbox will put manual daycare registrations in the "Pending" registration status. This would allow you to manually register a client and still have the option to manual confirm their registration.
- Count pending registrations toward total registrations - Checking this checkbox will allow you to have registrations in the "Pending" status count towards the total registration limit for that particular date.
Holidays and closed dates
Next you will want to set any holidays or closed dates you will have for daycare in the upcoming future. This will allow you to block out certain dates from online registration, even if it is a day of the week you are normally available. To do this you will want to look for the section titled Holiday/Closed Schedule. Inside this section you a calendar for each month that will see almost a year ahead in each view. If you wanted to block out a date, simply click on the day in the month you would like to be closed for and it will create a grey box on those days you are closed.
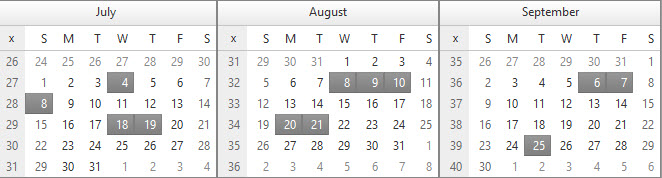
Once you are finished setting your closed days you will want to click Save in this section to save your changes. You have now successfully marked off dates on which you want your boarding to be closed. This will now grey the date out for clients making them unable to select that date.